Saturday, October 31, 2009

Pasta e Fagioli

Pasta Fagioli is a very easy and tasty peasant dish.  My grandmother always called it Pasta Fazoul,, I guess it's just one of those things that depend on where you are from.  Every family has their own recipe but basically they all have pasta, beans and stock.  You can make this more soupy by adding more broth and thinning it out (don't puree the beans) or you can eat it thicker, the way I like it by following the recipe below.  Giada's recipe calls for red kidney beans but I know it to be traditionally made with cannellini beans so I used both (3 cans in total).  I love the color that the kidney beans give to the dish. 
Giada's recipe is very easy and spot on.  Any changes I made were minor.  I didn't make a bouquet garni and instead just chopped the herbs and added them to the pot.  I used 4 ounces of pancetta because that's the only size package Cittero makes (Steve wanted even more). As always I used Romano cheese for topping but that's just personal preference.  In the future I will use a tip that my friend Lucy of Sweets, Savories, etc., told me.  Instead of pureeing some of the beans at the end, smash up some of the beans while they are in the can using a fork.  This makes a smoother texture.  I didn't like how the food processor chopped up the pancetta with the beans.  Thanks Lucy for a great tip!  I can't wait to try it.


Giada's Pasta e Fagioli
by Giada DeLaurentiis

See this recipe on the food network by clicking here.

Ingredients:

4 sprigs, fresh thyme
1 large sprig, rosemary
1 bay leaf
1 tbsp olive oil
1 tbsp butter
1 cup chopped onion
3 oz chopped pancetta
2 tsp minced garlic
5 3/4 cups low sodium chicken broth
2 - 14.5 ounce cans red kidney beans, rinsed and drained
3/4 cup elbow macaroni
freshly ground black pepper
pinch of crushed red pepper flakes (optional)
1/3 cup freshly grated parmesan
1 tbsp extra virgin olive oil


Directions:

1.  Wrap the thyme, rosemary, and bay leaf in a piece of cheesecloth and secure closed with kitchen twine. Heat 1 tablespoon olive oil and butter in a heavy large saucepan over medium heat. Add the onion, pancetta, and garlic and saute until the onion is tender, about 3 minutes. Add the broth, beans, and sachet of herbs. Cover and bring to a boil over high heat, then decrease the heat to medium and simmer until the vegetables are very tender, about 10 minutes. Discard the sachet. Puree 1 cup of the bean mixture in a blender until smooth*. Before putting the puree back into the soup, add the macaroni and boil with the lid on until it is tender but still firm to the bite, about 8 minutes. Return the puree to the remaining soup in the saucepan and stir well. Season the soup with ground black pepper and red pepper flakes.

2.  Ladle the soup into bowls. Sprinkle with some Parmesan and drizzle with extra-virgin olive oil just before serving.
 
*When blending hot liquids: Remove liquid from the heat and allow to cool for at least 5 minutes. Transfer liquid to a blender or food processor and fill it no more than halfway. If using a blender, release one corner of the lid. This prevents the vacuum effect that creates heat explosions. Place a towel over the top of the machine, pulse a few times then process on high speed until smooth.


Halloween Candy Cookies


I used to love Halloween when I was a kid. My older brother and I had a paper route with 150 customers in our neighborhood, starting when we were 8 and 9 years old, so we knew a lot of people -- a lot of people whose doors we could knock on on Halloween night and who would be handing out candy. We'd head out with our parents and baby sister (yes, Lindsay, you were the baby then) and fill up pillow cases two or three times, returning to the house on occasion to unload them onto the dining room table. Once we visited every possible house we could, we'd head back home and begin the candy sorting.

That's right. We sorted the candy. We'd stake claim on the king-size bars we had collected and then everything else would be shared. We'd stack the candy by type. Reese's PB cups always won. Snickers were pretty high up there too. I wonder what would win nowadays. My two youngest siblings are pretty much too old to go trick-or-treating anymore. If you have children or siblings who still go trick-or-treating, I'd love to hear what they collect the most of.

I wonder if I call home on Halloween night if my mom will be making a pot of hot dogs and beans, just like she always did on Halloween night when I was little. It probably depends on what my siblings are doing. I bet my 17-year-old sister will dress up as something silly and go to a Halloween party with her friends (they were colors one year -- she was orange -- and Christmas elves another year -- people asked them to sing carols). My little brother, who just turned 14, is a bit less predictable when it comes to this sort of thing.

We always had to have a hearty meal of hot dogs and beans to fill us up before we headed out, and we always had to dress warmly enough for the weather. This really put a damper on my style as I usually wanted to be a princess or a fairy, and I didn't know any princesses or fairies who wore cable-knit tights and sweaters. While I may have fought against the warm clothing, I was secretly thankful to have it once we got out into the chilly October air.

Halloween isn't the same for me now. It lost that magic that a lot of childhood things lose over the years. I don't enjoy dressing up now, and I rarely accept invites to Halloween parties that require costumes. In the places I've lived for the past 6 years, I haven't gotten any trick-or-treaters. And I've noticed that a lot of towns will plan a night for trick-or-treaters to go out that isn't necessarily October 31, which is just so strange and scheduled to me. It doesn't seem like it could hold the same magic and excitement for children now as it did for me when I was little, but I'm not a child anymore, so I could be wrong about that.

At any rate, I hope all of you and your families have a happy and safe Halloween. And if you want to do something will all of that candy besides just eat it -- which is perfectly acceptable -- I recommend taking your favorite candy, putting it in the freezer for a bit, chopping it up, and adding it to your favorite chocolate chip cookie recipe in place of chocolate chips.


Reese's PB Cup Cookies (adapted from the NY Times chocolate chip cookie recipe)

Ingredients
3 2/3 cups minus 2 tablespoons all-purpose flour
1 1/4 teaspoons baking soda
1 1/2 teaspoons baking powder
1 1/2 teaspoons coarse salt
2 1/2 sticks (1 1/4 cups) unsalted butter, softened
1 1/4 cups (10 ounces) light brown sugar
1 cup plus 2 tablespoons (8 ounces) granulated sugar
2 large eggs
2 teaspoons vanilla extract
10 or more large Reese's PB cups, frozen (I only had 10, but I think 20 would be better!)

Preparation

Sift flour, baking soda, baking powder and salt into a bowl. Set aside.

Coarsely chop PB cups, and set aside.

Using a mixer fitted with paddle attachment, cream butter and sugars together until very light, about 5 minutes. Add eggs, one at a time, mixing well after each addition. Stir in the vanilla. Reduce speed to low, add dry ingredients and mix until just combined, 5 to 10 seconds.

Add chopped Reese's PB cups and stir gently until mixed.

Press plastic wrap against dough and refrigerate for 24 to 36 hours. Dough may be used in batches, and can be refrigerated for up to 72 hours. You can also form the dough into balls, ready for baking, place them on cookie sheets, and freeze them. Once the balls of dough have hardened, scoop them into freezer bags, and take them out and bake them whenever you want warm cookies.

When ready to bake, preheat oven to 350 degrees. Line a baking sheet with parchment paper or a nonstick baking mat.

Place frozen cookie balls or freshly formed balls of dough (any size you like -- I like mini cookies so I form mine into about 1/2-inch balls) on prepared baking sheet. Bake for 10 to 12 minutes (or longer depending on the size), until light golden brown but still soft in center. Let rest for 1 minute, and then transfer cookies to cooling rack. Repeat with remaining dough for as many cookies as you want to make.

Friday, October 30, 2009

LEMON GARLIC WHITE BEANS AND MAHI MAHI


It's been a busy few weeks running around town. I'm feeling a bit worn down and desiring a greater focus on healthier and nourishing food. When I finally had some quiet time in the kitchen, I decided to make a quick and easy recipe, Lemon Garlic White Beans and Mahi Mahi, a dish featured on the lovely blog, Kahakai Kitchen.

continue reading...

A Tribute Meal- Hot Dogs & Potatoes

The passing of a family member is always hard, but I think it's important to celebrate their life and enjoy the memories you will keep with you. At my grandfather's memorial service, I couldn't help but to be in awe of all he accomplished with his almost 89 years. A man of many talents, he was incredibly generous with his time and touched many lives. Now I know where my dad gets it!

Me & Poppy

When it comes to food, there are certain things that I'll always remember about Poppy. The ends of bread were always his, and liked things crispy. Crispy may be putting it lightly, as that usually meant charred and overcooked ;) One of his favorite meals was hot dogs and potatoes. This week, I made it for him--here's to you, Poppy!


The general idea is to fry up some thinly sliced white potatoes, season with salt, pepper and paprika, and add in some sliced hot dogs and hot peppers. I tried to minimize the oil and used turkey dogs, but... it wasn't as good as I remember it. What can I say, most things are better when Nanny (or mom) makes it! Regardless, I'm sure Poppy was eye-ing the nice crispy layer that formed on the bottom of my stainless saute pan ;)

Chocolate With Francois: Chocolate Cremes Brulees


I joined a new baking group! I'm really quite excited about this particular group. It's called Chocolate With Francois, and we'll be making recipes from Francois Payard's Chocolate Epiphany: Exceptional Cookies, Cakes, and Confections for Everyone. You may have heard me mention this book before. It contains recipes for the most amazing chocolate granola and the most wonderful flourless chocolate cake I've ever made or eaten. The recipes range from fairly straightforward to quite elaborate, so I was relieved to see that our first recipe was one of the less complicated ones.

Julie from Little Bit of Everything created the group and chose the first recipe: chocolate cremes brulees.

I had never made creme brulee before now, let alone chocolate creme brulee. I was really excited to try, as it is one of my favorite custard-style desserts (though I admit I like panna cotta just a little better).

The custard is made with just four ingredients: 72% chocolate, sugar, egg yolks, and heavy cream.


The custard is baked just until set and then refrigerated until it is completely set.

chocolate creme brulee
Then comes the fun part -- or in my case, the difficult part. I had originally planned to make the creme brulees in shallow 4-ounce ramekins, but as I was drying them off after rinsing them I noticed the writing on the bottom: "no broiler." I needed to use the broiler because I don't yet own a blow torch (it's moved up on the list of must-have kitchen items now). Once I realized that I couldn't use the shallow dishes, I swapped them out for some taller ramekins, not thinking at the time of the implications this would have on the sugar caramelizing process.

Halving Payard's recipe, I ended up with 4 ramekins. The day after I made these, I took two of the chilled ramekins out of the fridge and, following the recipe, topped each with 2 tablespoons of sugar. This looked like way too much sugar to me.


And it was.


When I finished caramelizing the sugar, which took a lot longer than it should have given the tall ramekins and the lack of a blow torch, my creme brulees were thickly layered with hardened sheets of sugar -- sugar that would hurt your teeth if you bit into it but was wonderful when you let it melt in your mouth with a bit of the chocolate custard.


The following night, I tried using less sugar but ended up nearly burning the topping. I couldn't get it right, but the dessert was still delicious.

Payard recommends using brown sugar to "fancy up" the dessert, so I tried that as well. He explains that brown sugar is too moist to caramelize, so I had to dry it in a 200-degree oven for an hour first. Once it was dry, I crushed up any clumps with the back of a spoon and sprinkled the dried sugar over the remaining custard.

I put this one under the broil as well. I probably pulled it out a little prematurely, but I didn't want to risk burning another. Some of the brown sugar caramelized and some stayed on top adding an extra crunch. I liked the combination of the more complex brown sugar flavor with the chocolate.


I really look forward to making these cremes brulees again (and trying to make some other flavored ones) when I own a blow torch.

Check out Chocolate With Francois to see how the other members did!

Wednesday, October 28, 2009

WINE SPECTATOR GRAND TASTING New York City


Expectations ran high leading up to this event. We had been salivating, plotting and mapping out what we would do when the doors finally opened to Wine Spectator's Grand Tasting. And when it did open, I almost heard angelic music playing in the back of my head as my eyes woke to the heavenly rows of legendary wine producers offering a pour of their ethereal liquid.

continue reading...

Pork Chops Pizziaola

In an effort to get Steve to like pork chops I pulled out this recipe by Giada DeLaurentiis, which I thought would sort of mask that it's pork.  I had no such luck with Steve even though the pork wasn't dry at all (I'm giving up on him eating pork) but I really enjoyed it.  This is very similar to the Italian Chicken with Couscous that I make all the time.   I didn't really follow Giada's recipe exactly.  I added a lot to it but I will link her original recipe since it's what gave me the idea to make it this way.  Not sure if this is really pizziaola since I changed it up so much but I didn't know what else to call it.  You see how creative I was with naming my "Italian Chicken".  Haha! Feel free to follow the recipe as Giada has written it, try some or all of my changes or as always, do it your way. 

Pork Chops Pizziaola

Serves 2

Ingredients:

2 bone in center cut pork chops
1 can petite diced tomatoes
1 onion, thinly sliced
2 cloves garlic, thinly sliced
1 tsp. fresh thyme
1 tbsp. capers
10 kalamata olives, sliced
1/2 cup dry white wine
1/2 cup chicken broth
extra virgin olive oil
salt and pepper

Directions:

1.  Season pork on both sides with salt and pepper. Brown in olive oil until pork gets golden brown and pulls away from the pan without sticking.  Remove chops from pan and set aside.


2.  Reduce heat to medium low and add more oil (or even butter) if the pan seems dry.  Add onions, garlic and thyme.  When onions have softened turn heat up a little and add wine.  Use a wooden spoon to pick up all the browned bits that have stuck to the pan.  This is where all the flavor is.  I thought I took a picture of this but it's not there anymore!


3.  Add tomatoes, chicken broth, capers and olives and season with salt and pepper.  Put pork back into the pan with the sauce and pour in any accumulated juices.  Cover and let simmer for about 10 minutes, turning once and spooning the sauce on top.  Depending on the thickness of your pork chops you may need to cook them longer.  Cut into them to see that it's white inside (or slightly pink) or when the temperature reaches 160 degrees.  

I like to serve this (and my Italian Chicken) with pine nut couscous with the sauce spooned over it.  It's delicious!


Tuesday, October 27, 2009

Apple Cider Doughnuts

With the acquisition of a mini doughnut pan and some farm-fresh apple cider, I knew I wanted to create a healthier version of one of my favorite fall treats--cider doughnuts! After some field research ;) and online searching, I came up with a recipe that can be enjoyed a bit more often than its fried counterpart! I think the taste is pretty spot-on, but the texture was more like a muffin. My testers (thanks Elina and Kerstin) seemed to enjoy them, though!

Baked Apple Cider Doughnuts


Baked Cider Doughnuts
Recipe by Shannon, adapted from Diana's Desserts and the Food Network
Yield: ~16 mini doughnuts


I filled mine a bit too much, and the top looked almost like muffins! I'd fill them a little more than half-way, as these little doughnuts will rise. You may get more out of them this way. A regular-size doughnut pan can also be used.

For the apple puree:
1 apple, peeled and diced (I used Cortland)
3/4c apple cider

Dry ingredients:
1c whole wheat pastry flour (or white whole wheat)
3/4t baking powder
3/4t baking soda
1t cinnamon
1/4t salt
1/8t fresh grated nutmeg (I eye-balled this amount)

Wet ingredients:
1 egg white, lightly beaten
1/3c turbinado sugar (or brown sugar)
1/4c apple puree (from above)
1 1/2oz maple syrup (I used grade B)
1 1/2oz apple cider
1 1/2oz greek yogurt
1 1/2T veggie oil (I use Smart Balance Omega blend)

For the topping:
1c apple cider
1/4c powdered sugar
cinnamon-sugar mixture (I used a premade mix from gosh knows when!)

Prepare the apple puree by simmering the diced apple and 3/4c cider over med-low heat until broken down. Puree with immersion blender (or regular one). You should have 1/4c puree. If you have more than this, return to heat and simmer until reduced. Let cool. This can be made ahead, if you'd like.

Preheat oven to 375deg. Spray doughnut pan lightly with cooking spray and sprinkle with cinnamon-sugar. To prepare the glaze: add 1c cider to small saucepan and simmer over med-low heat until reduced to ~1/4c. Whisk in 1c powdered sugar until smooth and glossy. Use more cider or powdered sugar to adjust consistency if needed.

Combine the dry ingredients and whisk/stir well together in a small bowl. Whisk together wet ingredients in a medium bowl . Add dry ingredients to wet and stir until just combined. In prepared doughnut pan, fill cavities halfway full. Bake ~10min, until they spring back when lightly touched. Remove from oven and turn onto cooling rack. Repeat with remaining dough. Add cinnamon-sugar to plate. When cooled slightly, dip top (and/or bottom) of doughnuts in glaze and then into cinn-sugar mix. Serve warm.

These are best served the day you make them, but I stored some in the fridge overnight and they made for a perfect post-run treat! Just warm for a few seconds and dig in :)

Daring Bakers: Macarons


You win some, and you lose some. I lost this one.

The 2009 October Daring Bakers’ challenge was brought to us by Ami S. She chose macarons from Claudia Fleming’s The Last Course: The Desserts of Gramercy Tavern as the challenge recipe.

I was really hoping I'd be able to master this challenge. I'm absolutely fascincated by macarons (which are made with almond flour and are not to be confused with macaroons, which are those coconut cookies). They come in so many different colors and flavors. I figured the possibilites were endless, and I'd be able to make something really spectacular for this challenge.

Then I learned that the color and flavor has to be added in powder form because the macarons cannot contain too much moisture. I did a little research and kept up with the Daring Bakers' forum discussion to try to figure out how I could add color and flavor to my macarons.

It seems that I shouldn't even have bothered, considering that I couldn't get the plain almond-flavored macarons to come out right. In addition to trying to make the plain macarons, the other flavors I attempted were pistachio with a pistachio white chocolate ganache, pumpkin spice latte (which should have had a cinnamon whipped cream filling), and cinnamon mocha (meant to have a chocolate ganache filling). I didn't even make the fillings for the last two flavors because the cookies came out looking like flat wafers.


The plain macarons tasted great, and I filled them with chocolate ganache, but they never grew feet. And macarons are supposed to have feet. Compare my pictures to those of the Daring Bakers who had success with this challenge, and you'll immediately see what I'm talking about. (Oh, and in case you're wondering, I did make mini macarons, just like I make mini everything else. These were a little smaller than a penny.)


The pistachio ones, which I flavored with pistachio pudding powder were pretty tasty as well but a bit on the soft side.

While this challenge didn't go so well, I plan to try out some other macaron recipes in the future to see if I can find a recipe and system that works for me.

I made Francois Payard's chocolate macarons a while ago and loved them, but this was before I knew that macarons were supposed to have feet. Now I realize those didn't come out right either.

So how about you... have you made macarons? Were you successful?

If you want to see my most successful Daring Bakers' Challenge, check out last month's!
Happy to be one of fifteen finalists for Creative Nonfiction's blog contest! My entry can be seen here.

Monday, October 26, 2009

WARM LENTIL SALAD WITH APPLES AND CURRANTS


As the weather growers colder, my appetite for heartier and richer meals grows, a desire that easily leads to recipes that call for a good dose of cream and butter.

continue reading...

And the winner is...

Thank you to everyone who entered my giveaway!! I have many new blogs to check out, hopefully I'll be able to make the rounds in the next week or so :) For those of you who visited Tri to Cook for the first time, I hope to see you again! To entice you back, I'll let you know that tomorrow I'll be posting some Baked Apple Cider Doughnuts...

without further ado, thanks to Random.org, the winner is...

Diana of Soap and Chocolate!!

Girl, shoot me an email (tri2cook [at] gmail) and I'll get you in touch with the right people ;) Hopefully you'll have no more ice-y concoctions!

Thanks again to everyone for making this a fabulous year (and 2 months)!!

Sunday, October 25, 2009

HASSELBACK POTATOES


Potatoes are a staple at our house, where we celebrate its versatility by baking, roasting, whipping, and stewing. I'm always searching for new ways to prepare this starchy vegetable, so I was thrilled to discover hasselback potatoes while perusing through Food Gawker.

continue reading...

Saturday, October 24, 2009

Fun in the Sun - AZ

I think I need a vacation from my vacation! It's been quite hard to catch up and get back in the swing of things, but I thought a quick recap of my trip to Arizona would be a good distraction :) My parents and I went out to visit family and get away for a bit. After my luggage arrived (a day after I did :/), I was able to enjoy myself and have a great trip!

Some of the highlights...

Andre Agassi

We caught the last match of a Champions Tourney and it was great to see Andre Agassi in action again. Oh how I love him! I always liked watching him play, and once imagined my backhand to be like his (ha).

Pinnacle Peak

I dragged my dad on a couple of hikes, one day up Pinnacle Peak and another on the Lost Dog Trail. I forgot to find out where the name of the latter trail came from, but we didn't cross the paths of any dogs-- just lots of cacti!

view from the Lost Dog Trail

I know I was on vacation, but I actually went to PT while I was in Arizona! If you're in the Phoenix/Scottsdale area, I would highly recommend Endurance Rehabilitation. I've been to a few physical therapists and various doctors about my knee/heel issues and orthotics, and I can't say enough good things about them. Except I wish they were back east!


Another unexpected treat was the chance to meet an awesome blogger and her adorable daughter! It was great to have a chance to chat with Averie, she's just as passionate and inspiring in real life as on her blog! Skylar's was a little picture shy for me, but luckily Averie had the good sense to snap a quick picture before we had to part ways.

Me & Averie


Later in the week we hit up the Pueblo Grande Museum to escape the escalating temperatures (our last day hit 100!) and I was quite fascinated to see how well the prehistoric Hohokam people cooked ;) By placing grasses and herbs around hot stones and agave hearts, they were essentially infusing their food cooked in their "ovens"! How neat is that?!


While we didn't try cooking like the Hohokam, we did have a few terrific meals. My parents indulged my peanut butter habit and went to lunch with me at a P.B.Loco Cafe. I've already recreated the sandwich I had (Curry/Spicy PB, cucumber and pineapple on wheat, toasted or pressed), and I think they enjoyed it, too! We won't talk about how much of the jar I bought (the Sumatra Cinnamon & Raisin was my fav) there is left...

Curry Spice Sandwich

Luckily our pb-filled lunches held our bellies over through the wait at Pizzaria Bianco. The food was definitely worth it-- their antipasto plate was a wonderful assortment of roasted veggies (butternut squash, zucchini, mushrooms, peppers...) that was quickly polished off. The brick oven is in the corner of the restaurant, and the bread and pizzas it produced were pretty amazing. Thin and crispy, we couldn't wait to dig in to our pizzas! Sudded with rosemary and pistachios, the Rosa took us by surprise, but the Wiseguy with roasted crimini's stole our hearts. Definitely a restaurant I would recommend, if you can get there at 4:30. Grab a drink at the bar next door, get in line, and enjoy each others company until the restaurant opens at 5 :)


My aunt also took us to a fabulous French place, Zinc Bistro, that took her back to the streets of Paris (I've never been, so I can't say ;)). Everything we had there was phenomenal, but the dish that is at the top of my list to recreate is their pistachio ice cream. The waitress we had was awesome, going above and beyond to try and find the recipe for me! She confirmed my suspicion--it had a coconut milk base. When I make room in my freezer, expect me to figure this one out :) As our "last meal" we went to White Chocolate Grill, which was also pretty good. They made their bread pudding with croissants, which won over a few of my dining companions!

I've probably missed something along the way, but it was great to go on vacation with my parents (it had been awhile!). It was also fun to meet my cousins' wives and their kids... crazy to think about how old that makes us! I leave you with one of my new buddies, we had fun flirting at lunch one day ;) Isn't he just the cutest??

Me & Tommy

Pumpkin Ricotta Pancakes


Last week I made some pumpkin brownies. (I didn't post them because I thought that they looked ugly.) There was about 1/2 cup or so of leftover canned pumpkin and I've been tossing around ideas for using it up. I've seen so many wonderful recipes on the blogs that I've been reading. I've seen pumpkin muffins, pumpkin pasta, pumpkin bread and cakes and of course pancakes. This morning I woke up a little late due to all the red wine I consumed last night and I was craving a diner's breakfast. You know how it is. But I knew that by the time I woke up Steve and we both showered it would be lunch time before we got to have breakfast out. I took at look in my fridge and saw a container of ricotta that I had and then and idea hit me. What if I used my cousin Tiffany's sour cream pancakes recipe and used ricotta instead? I could just add the pumpkin and see what happens and that was how this recipe was born.

The pancakes are delicious and perfect for this time of year and it's a great way to use up the leftover pumpkin since you don't really need that much to get the pumpkin flavor. If you have sour cream on hand you can use that too as that's what the original recipe calls for. If you use the ricotta it may seem a little thick so just thin it out with a little more milk. I was also easy on the cinnamon and nutmeg but I suggest using a bit more for stronger flavor. That's how it goes with experiments, right? In the recipe I'm giving you I'm going to use the amount of spices that I think would be better not what I used. I used only 1/4 tsp nutmeg and 1/2 tsp cinnamon.

Pumpkin Ricotta Pancakes

2 Cups all-purpose flour
½ cup sugar
2 tsp baking powder
1 tsp baking soda
½ tsp salt
1 ½ cups milk (plus more if your batter is too thick)
1 cup ricotta
2 eggs
6 Tablespoons unsalted butter
1/2 cup canned pumpkin (not pumpkin pie mix)
1/4 tsp nutmeg
1/2 tsp cinnamon


Whisk together the flour, sugar, baking powder, baking soda and salt cinnamon and nutmeg. In another bowl, whisk together the milk, ricotta, eggs, melted butter, canned pumpkin. Pour the milk mixture into the flour and stir until combined.

Spray griddle with cooking spray and cook pancakes over medium heat(you may need to reduce the temp to low after the pan heats up so your pancakes don't get too dark). These pancakes take a little longer to bubble and cook around the edges, so be patient and don't flip them too soon.

Makes approx 20 pancakes


Friday, October 23, 2009

Mini Pumpkin Whoopie Pies

pumpkin whoopie pies
I'm not sure why, but for some reason I thought I would be the only person to make pumpkin whoopie pies this fall. I turned my back for a second, likely to scour the supermarket shelves for pumpkin, and suddenly pumpkin whoopie pies were everywhere! I couldn't believe how many people had not only heard of them but gone ahead and made them too. Wasn't I a bit naive?

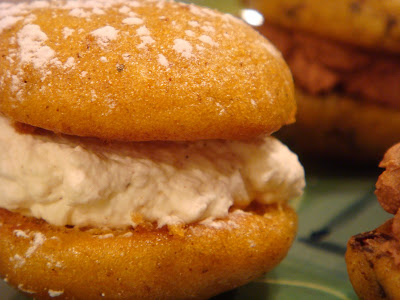
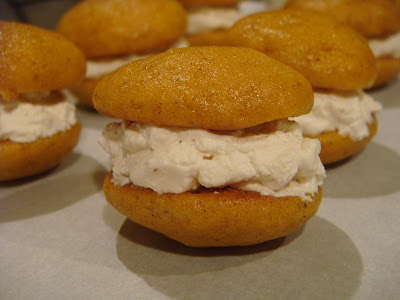
A little late in the game, here are mine. There are a few variations out there, and this recipe is a bit different from the others I've seen. Most have had a cream cheese-based filling, but these sandwich a light cinnamon whipped cream instead.

pumpkin whoopie pies
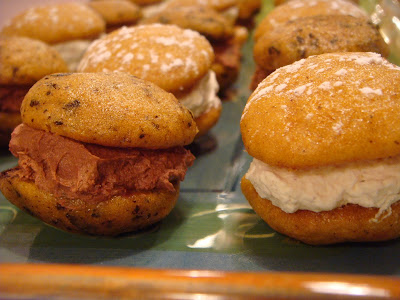
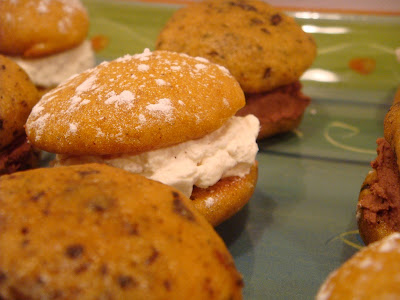
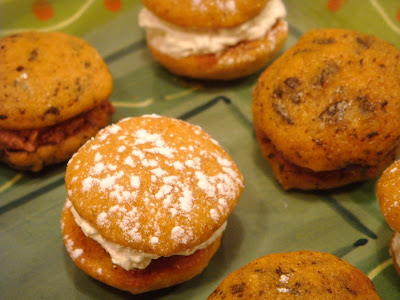
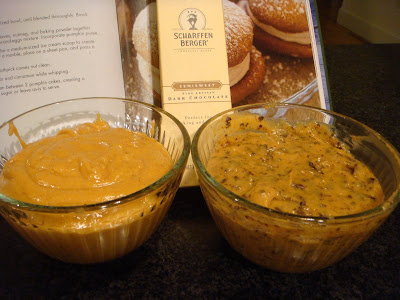
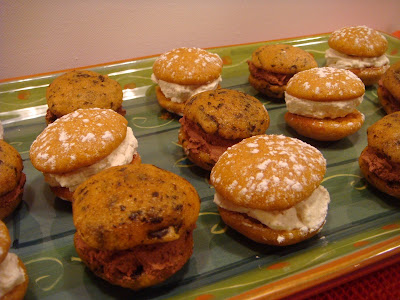
I also added chopped chocolate to half of the batter and filled those whoopie pies with whipped chocolate ganache. This is a great option if you're looking for something a bit more decadent. Chocolate and pumpkin actually work really well together, although I guess chocolate combines pretty well with just about anything, so this shouldn't be too much of a surprise.

pumpkin whoopie pies
Oh, and also, these are mini pumpkin whoopie pies, so they just ooze cuteness, right?

pumpkin whoopie pies
This pumpkin whoopie pie recipe comes from Fresh & Honest: Food From the Farms of New England and the Kitchen of Henrietta's Table. Henrietta's Table is one of my favorite restaurants in Cambridge, Mass. I actually haven't had the pumpkin whoopie pies there (too busy eating the granola I suppose), but when I do, I'll have to see how close mine came to the original.

On a side note, while I love that this cookbook contains recipes from one of my favorite restaurants, the recipes don't seem like they were tested or copyedited. For instance, the whoopie pie one says to preheat the oven, mix the dough, and then put the dough in the fridge for at least an hour to set. Is one supposed to leave the oven on doing nothing for an hour? There are also some issues with the yield, and I've encountered confusion and inconsistencies in some of the other recipes as well.

That said, I've rewritten the recipe here, along with some of my own additions (such as the chocolate and ganache), so that it's easier to follow.

pumpkin whoopie pies
Mini Pumpkin Whoopie Pies (adapted from Fresh & Honest)
Printable version

Ingredients

Cakes
1 1/4 cups sugar
1/2 cup oil
3 eggs
2 cups all-purpose flour
1 1/2 teaspoons baking soda
1/4 teaspoon baking powder
1/2 teaspoon cinnamon
1/4 teaspoon ground cloves
1/4 teaspoon nutmeg
1/4 teaspoon salt
1 cup pumpkin puree
3 oz. of your favorite chocolate, chopped (or mini chips) (optional)

Whipped Cream Filling
1 cup heavy whipping cream
1/2 tablespoon confectioners sugar
1/4 teaspoon cinnamon

Whipped Ganache Filling (optional)
1 cup heavy whipping cream
4 oz. of your favorite chocolate, chopped

Preparation

Sift flour, baking soda, baking powder, spices, and salt together in a medium-sized bowl. Set aside.

Mix sugar and oil in bowl of electric mixer until well combined. Add eggs one at a time, beating after each addition.

Add the flour mixture to the sugar mixture and beat on low until combined. Mix in the pumpkin.

pumpkin whoopie batter
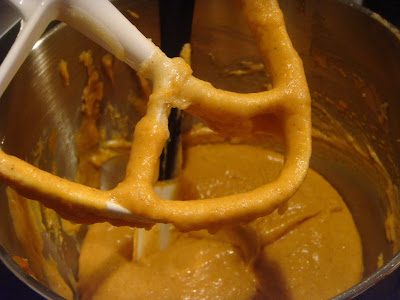
Chocolate version: Divide batter between two medium bowls. Add the chopped chocolate to one bowl and mix until combined.

plain and chocolate pumpkin whoopie pie batter
Place batter in fridge for at least 1 hour (I left mine overnight).

Prepare the whipped chocolate ganache. In a small pot over medium-high heat, bring heavy cream to a boil. Remove from heat, and stir in the chopped chocolate. Place in refrigerator for a couple of hours.

When you are ready to bake your whoopie pies, preheat the oven to 325 degrees. Line sheet pans with parchment paper, and remove batter from the fridge.

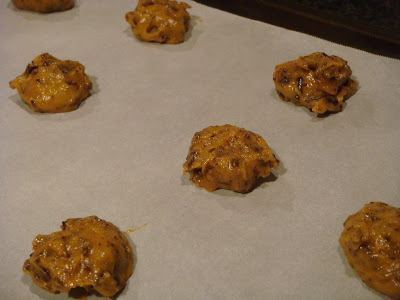
Using a round measuring spoon or ice cream scoop, scoop rounded spoonfuls of batter onto prepared sheet pans. (You can make the pies whatever size you want, but I used a round measuring teaspoon to scoop the batter so I could make minis.) Leave space between the scoops. Use your fingers to round out the batter a little.

chocolate pumpkin whoopie pies ready for baking
pumpkin whoopie pies ready for baking

Bake each tray for about 7 to 8 minutes for minis (10 to 12 minutes for larger pies), or until toothpick comes out clean.

baked chocolate pumpkin whoopie pies
baked pumpkin whoopie pies
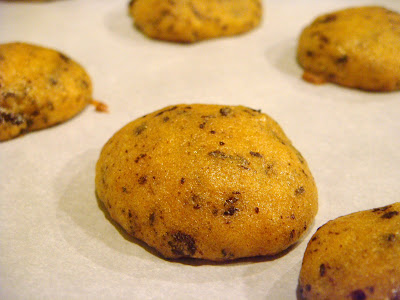
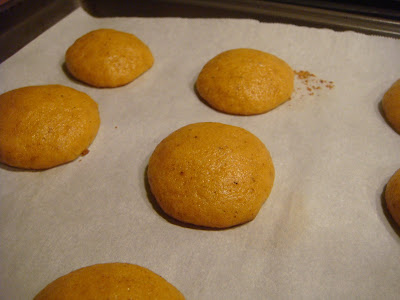
Let cool on pan for about a minute, and then move pies off pans to cooling racks. (You'll have to keep reusing trays until you run out of batter. I had three trays, and I think I filled each twice.)

Once you're done baking off all of the batter and your pies are cooling, make the whipped cream filling.

In bowl (preferably a chilled bowl) of an electric mixer fitted with wire whip, whip cream until stiff peaks form, adding in confectioners sugar and cinnamon while mixer is running. Move the cream to another bowl, and clean the mixing bowl and whip attachment.

At this point, the chocolate ganache should be firm enough to whip. Place ganache in bowl of electric mixer fitted with wire whip, and whip until light and fluffy.

Try to match up the pies so you sandwich the ones that are closest in size and shape.

whoopie pie tops and bottoms
Fill your pies. I used the whipped cream filling for the plain pies and the whipped chocolate ganache filling for the chocolate speckled pies. (You may need to make more of the fillings, depending how thickly you fill the pies. I had plenty of chocolate ganache but cut it close on the whipped cream.) I just used a small offset spatula because I didn't have a ton of time and I'm not really bringing these anywhere, but I think piping the filling would look much more elegant.

whipped cream filled pumpkin whoopie pies
whipped chocolate ganache filled pumpkin whoopie pies
Dust the pies with confectioners sugar if desired.

One of the things I liked best about making these is that you could pretty much smell when they were done. I'd start to catch a whiff of baked pumpkin and spices in the air and quickly run over to check them with a toothpick, and without fail they'd be ready. The whole kitchen smelled like fall.

These would be perfect for a light party dessert.

pumpkin whoopie pies
Where else can you find pumpkin whoopie pie recipes?

Willow Bird Baking
Playing House
How To Heroes
Serious Eats

And everyone who does Sweet Melissa Sundays recently posted about spiced pumpkin cookie cakes, which look very much like whoopie pies to me.

Have you jumped on the whoopie pie bandwagon, pumpkin or otherwise? Do tell!