Wednesday, September 30, 2009

BRAISED PORK SHANKS OVER WHITE BEANS


Have you ever thought twice when a significant other offered to cook dinner for you? Not because they're not a good cook, but because you knew it was going to take so long that you might be having two dinners the following day? One just past mid-night and again later that evening.

continue reading...

Chicken Cutlet Parmigiana

Here's another Italian American favorite. It's a very easy dish to make and everyone loves it. It's also another great way to use up leftovers. If you know how to make marinara sauce and you know how to fry up some chicken cutlets you can make this dish. In fact, I've already given you the recipes to make this dish in other posts. You just have to put it together. I'll repost the recipes for Chicken Milanese (Breaded Chicken Cutlets) and Marinara sauce here for you. Serve with spaghetti and marinara sauce and a salad and you have a delicious meal.

Chicken Cutlet Parmigiana

Ingredients:

Chicken Cutlets prepared Milanese style (aka - breaded and fried, See below
Marinara sauce, prepared, See Below
shredded mozzarella
romano cheese

Directions:

Preheat oven to 350 degrees. In a large pan or baking sheet (with high sides, like a jelly roll pan), ladle enough sauce to cover bottom of pan. Add chicken cutlets, cover with sauce, sprinkle with cheese and top with mozzarella. Bake until cheese is melted and brown.


SORRY - I FORGOT TO TAKE A PICTURE OF JUST THE CHICKEN WITH THE SAUCE BUT YOU GET THE IDEA, RIGHT?


Chicken Milanese

Ingredients:

chicken cutlets
2 eggs
splash of milk
salt and pepper
romano cheese
parsley (fresh or dried)
garlic powder
canola oil, for frying

Directions:

1. Beat eggs and mix with milk, salt, pepper and garlic powder and a few teaspoons of cheese.

2. In another dish mix breadcrumbs with garlic powder, parsley and about 1/4 cup romano cheese (maybe more).

3. Dip cutlets in egg mixture (let excess drip off) and then cover with breadcrumbs pressing down with your hands to get the breadcrumbs to adhere to chicken. Do this on both sides.

4. If you have extra egg mixture and breadcrums you can make bread patties or polpette (that's what Nanny called them). Add the breadcrumbs to the egg and mix it together with a fork. Once combined form little patties with your hands.

5. Let oil get very hot. Make sure you use enough oil to completely cover the pan and go up the sides a little bit. You don't want to keep adding cold oil to the pan because it will drop the temperature and the cutlets will absorb too much oil. Fry cutlets (and bread patties if making) until browned. Turn and cook the other side.

6. As your cutlets and patties are done add them to a paper towel lined plate and put a piece of paper towel between each layer to absorb excess oil.

Marinara Sauce

Ingredients:

1 28oz can crushed tomatoes
4 cloves minced garlic
1 medium onion, diced
3 tsp chopped fresh basil (use less if dried)
1-2 tsp dried Italian seasoning
crushed red pepper flakes, to taste
salt and pepper to taste
1 tsp sugar
extra virgin olive oil

*Note - When using dried herbs don't double the amount exactly if you want to double the recipe. It may overpower the sauce.

Feel free to use fresh frozen or dried herbs. Sometimes I use the Italian Seasoning but this time I didn't because I didn't want it to overpower the flavor of the kale. It's a preference, it will be good either way.

Directions:

Sweat onions in extra virgin olive oil and then add garlic in oil. Let it cook for a minute or to and then add crushed red pepper and frozen or dried herbs. Add tomatoes, salt, pepper and sugar. If using fresh herbs add now. Let it come to a boil and then lower heat. Cook on medium for 30-40 minutes. Taste it and adjust seasoning as needed.


Tuesday, September 29, 2009

A Taste of Emeril

A crazy weekend in Philly that included 12hrs on the train left me with a nasty cold that is ever-so-slowly getting better. While I did some cooking, I couldn't taste it until this weekend :/ I've been meaning to give a shoutout to Foodbuzz's Tastemaker program, through which I recieved some Emeril goodies to try out. I don't go through my spices and condiments too quickly cooking for one, so I can't report on most of the products yet. I'm actually really excited to try the kicked up mustard, as I have a new taste for a little horseradish with my kiebasa :)

Thank you Foodbuzz!

I did tried the organic Vegetable stock when I made Kalyn's Autumn Harvest Soup this past week. As I normally use chicken stock, I was very impressed with the flavor of the stock and would definitely use it again if the price was right! I don't know if it was my particular spices, but I felt like the soup could've used a bit more. That also might have been my taste buds ;) This was also a delight to eat texture-wise as it combined kale, butternut, and farro! Not quite chicken soup, I think it had enough nutritional goodness to help fight my cold ;)

Autumn Harvest Soup


Boston-area bloggers/readers/friends: Let me know if you're interested in an apple-picking adventure at Smolak Farms this Sunday morning!!

Anyone else have plans to do some apple picking this fall?? I may have to try my hand at making apple cider donuts...

A VERY STINKY CHEESE


I don't pick up cheese very often, unless it's for my husband who likes to have a few thin slices of Pleasant Ridge in his omelet. Cheese aficionados are probably shaking their head right now. I've tried to steer him many times to substitute another cheese, telling him that this particular cheese is best consumed at room temperature not melted! But I don't know enough about cheeses to suggest a substitute. Needless to say I've been trying to broaden my palate.

continue reading...

Making Vol-Au-Vents

puff pastry dough
Okay, so if you've been following along, on Sunday, we revealed the Daring Bakers' challenge: vol-au-vents. It was an incredibly fun challenge. You can see my post about the finished product here.

Yesterday, I shared the recipe and method for making puff pastry with you.

Today, you'll see how the vol-au-vents are made from that puff pastry. Below are the instructions from the Daring Bakers' challenge, as well as some notes and pictures from me.

Forming and Baking the Vol-au-Vents (instructions from Steph of A Whisk and a Spoon)

Need
Well-chilled puff pastry dough (recipe below)
Egg wash (1 egg or yolk beaten with a small amount of water)

Line a baking sheet with parchment and set aside.

Using a knife or metal bench scraper, divided your chilled puff pastry dough into three equal pieces. Work with one piece of the dough, and leave the rest wrapped and chilled. (You can repeat the whole process with the other two pieces, depending on how many vol-au-vents you want.)

On a lightly floured surface, roll the piece of dough into a rectangle about 1/8 to 1/4-inch (3-6 mm) thick. Transfer it to the baking sheet and refrigerate for about 10 minutes before proceeding with the cutting.

puff pastry dough square and rolling pin
rolled out puff pastry dough
(This assumes you will be using round cutters, but if you do not have them, it is possible to cut square vol-au-vents using a sharp chef’s knife.) For smaller, hors d'oeuvre sized vols-au-vent, use a 1.5” round cutter to cut out 8-10 circles. For larger sized vol-au-vents, fit for a main course or dessert, use a 4” cutter to cut out about 4 circles. Make clean, sharp cuts and try not to twist your cutters back and forth or drag your knife through the dough. Half of these rounds will be for the bases, and the other half will be for the sides. (Save any scrap by stacking -- not wadding up -- the pieces: They can be re-rolled and used if you need extra dough. If you do need to re-roll scrap to get enough disks, be sure to use any rounds cut from it for the bases, not the ring-shaped sides.)

Using a ¾-inch cutter for small vols-au-vent, or a 2- to 2.5-inch round cutter for large, cut centers from half of the rounds to make rings. These rings will become the sides of the vol-au-vents, while the solid disks will be the bottoms. You can either save the center cut-outs to bake off as little "caps" for you vol-au-vents, or put them in the scrap pile.

I also used cookie cutters to get different shapes for the middles and caps. I used apples, stars, and hearts. I knew I'd be making an apple filling, and I thought apple caps would just be adorable for that. And I ended up using a slightly larger outer ring (I think 2" or 2 1/4") because my smallest inner ring was 1" not 3/4".


biscuit cutters and dough
Dock the solid bottom rounds with a fork (prick them lightly, making sure not to go all the way through the pastry) and lightly brush them with egg wash. Place the rings directly on top of the bottom rounds and very lightly press them to adhere. Brush the top rings lightly with egg wash, trying not to drip any down the sides (which may inhibit rise). If you are using the little “caps,” dock and egg wash them as well.

dough cutouts for vols-au-vent
dough cutouts brushed with egg
dough cutouts using apple and star cutters
dough cutouts brushed with egg
Refrigerate the assembled vol-au-vents on the lined baking sheet while you pre-heat the oven to 400ºF (200ºC). (You could also cover and refrigerate them for a few hours at this point.) This is important. My last batch may have gotten a little too warm and didn't rise as well as the rest.

Once the oven is heated, remove the sheet from the refrigerator and place a silicon baking mat (preferred because of its weight) or another sheet of parchment over top of the shells. This will help them rise evenly. Bake the shells until they have risen and begin to brown, about 10-15 minutes depending on their size. Reduce the oven temperature to 350ºF (180ºC), and remove the silicon mat or parchment sheet from the top of the vol-au-vents. If the centers have risen up inside the vol-au-vents, you can gently press them down. (A tart tamper works well for this.)

vols-au-vent bakign under silpat
vols-au-vent
vols-au-vent
At this point, I let mine cool and then I froze them until I was ready to fill them a few days later. You can then follow the directions below to bake the frozen ones, though you may need to tack on a couple of minutes. If you have fillings that you want warmed, put those in the frozen vol-au-vents before you bake them.

vols-au-vent
Continue baking (with no sheet on top) until the layers are golden, about 15-20 minutes more. (If you are baking the center “caps” they will likely be finished well ahead of the shells, so keep an eye on them and remove them from the oven when browned.)

Remove to a rack to cool. Cool to room temperature for cold fillings or to warm for hot fillings.

Fill and serve.


Next up: The fillings! And also, if you have leftover puff scraps from shaping the vol-au-vents, don't throw them out! Stack the pieces, wrap them in plastic, and toss them in the fridge. I'll give you a fun idea of what you can make with those scraps very soon.

Monday, September 28, 2009

EDAMAME


Snackalicious and healthy, edamame is one of my favorite items to nosh on next to chips and guacamole. In addition to being a major source of protein, this little bean packs a big nutritional punch, one cup yields in excess of 100% of the daily recommended dose of folate, 79% of manganese, and more than 50% of vitamin K.

continue reading...

Puff Pastry (For Vol-Au-Vents)

Yesterday I shared with you my completed vol-au-vents. Today I want you to see all the hard labor involved in making puff pastry. Tomorrow we'll look at how to shape the vol-au-vents.

As you know from yesterday's post, the vol-au-vents were this month's Daring Bakers' challenge. We were required to use Michel Richard's recipe to make the puff pastry. Here's how to do it...

Michel Richard’s Puff Pastry Dough
From: Baking with Julia by Dorie Greenspan
Yield: 2-1/2 pounds dough

Ingredients
2 1/2 cups unbleached all-purpose flour
1 1/4 cups cake flour
1 TBS salt
1 1/4 cups ice water
1 pound very cold unsalted butter

plus extra flour for dusting work surface

puff pastry tools and ingredients
Mixing The Dough

Check the capacity of your food processor before you start. If it cannot hold the full quantity of ingredients, make the dough into two batches and combine them. (My food processor is teeny, so I made the dough in my KitchenAid mixer instead, using the dough hook.)

Put the all-purpose flour, cake flour, and salt in the work bowl of a food processor fitted with a metal blade and pulse a couple of times just to mix. Add the water all at once, pulsing until the dough forms a ball on the blade. The dough will be very moist and pliable and will hold together when squeezed between your fingers. (Actually, it will feel like Play-Doh.)

Remove the dough from the machine, form it into a ball, with a small sharp knife, slash the top in a tic-tac-toe pattern. Wrap the dough in a damp towel and refrigerate for about 5 minutes.

dough for puff pastry
Meanwhile, place the butter between 2 sheets of plastic wrap and beat it with a rolling pin until it flattens into a square that's about 1" thick. Take care that the butter remains cool and firm: if it has softened or become oily, chill it before continuing.

butter
flattening butter for puff pastry

Incorporating The Butter

Unwrap the dough and place it on a work surface dusted with all-purpose flour (A cool piece of marble is the ideal surface for puff pastry) with your rolling pin (preferably a French rolling pin without handles), press on the dough to flatten it and then roll it into a 10" square. Keep the top and bottom of the dough well floured to prevent sticking and lift the dough and move it around frequently. Starting from the center of the square, roll out over each corner to create a thick center pad with "ears," or flaps.

Place the cold butter in the middle of the dough and fold the ears over the butter, stretching them as needed so that they overlap slightly and encase the butter completely. (If you have to stretch the dough, stretch it from all over; don't just pull the ends.) You should now have a package that is 8" square.


To make great puff pastry, it is important to keep the dough cold at all times. There are specified times for chilling the dough, but if your room is warm, or you work slowly, or you find that for no particular reason the butter starts to ooze out of the pastry, cover the dough with plastic wrap and refrigerate it. You can stop at any point in the process and continue at your convenience or when the dough is properly chilled.

Making The Turns

Gently but firmly press the rolling pin against the top and bottom edges of the square (this will help keep it square). Then, keeping the work surface and the top of the dough well floured to prevent sticking, roll the dough into a rectangle that is three times as long as the square you started with, about 24" (don't worry about the width of the rectangle: if you get the 24", everything else will work itself out.) With this first roll, it is particularly important that the butter be rolled evenly along the length and width of the rectangle; check when you start rolling that the butter is moving along well, and roll a bit harder or more evenly, if necessary, to get a smooth, even dough-butter sandwich.

With a pastry brush, brush off the excess flour from the top of the dough, and fold the rectangle up from the bottom and down from the top in thirds, like a business letter, brushing off the excess flour. You have completed one turn.


Rotate the dough so that the closed fold is to your left, like the spine of a book. Repeat the rolling and folding process, rolling the dough to a length of 24" and then folding it in thirds. This is the second turn.

Chilling The Dough

If the dough is still cool and no butter is oozing out, you can give the dough another two turns now. If the condition of the dough is iffy, wrap it in plastic wrap and refrigerate it for at least 30 minutes. Each time you refrigerate the dough, mark the number of turns you've completed by indenting the dough with your fingertips. It is best to refrigerate the dough for 30 to 60 minutes between each set of two turns.


The total number of turns needed is six. If you prefer, you can give the dough just four turns now, chill it overnight, and do the last two turns the next day. Puff pastry is extremely flexible in this regard. However, no matter how you arrange your schedule, you should plan to chill the dough for at least an hour before cutting or shaping it.


It definitely takes a long time to make, but it's helpful that you can start and stop when it's convenient for you. As the recipe advises, chill your dough often! If you're doing a turn, and you notice some butter oozing through the dough, don't try to do the next turn until the dough has been refrigerated for at least 30 minutes.

Rest assured, this is not nearly as hard as it looks. Who knew butter could be beaten into submission and then layered with dough? It's absolutely fascinating when you see it happening. The dough gets firmer and smoother as you work the butter through it with each turn.

And then when you bake the puff pastry dough, and you see that it actually puffs, you'll be so excited, you'll want to tell everyone you know. Or at least give yourself a huge pat on the back.

Sunday, September 27, 2009

Angela's Pasta with Kale


Last week I bought the October issue of Bon Apetit Magazine and loved the article I read about Kale. I never had Kale before and it made me really curious. I posted this on facebook and I got a reply from Angela to try her Pasta with Kale recipe. I've known Angela pretty much my entire life, you see, we used to live across the street from each other in Brooklyn and then a few blocks from each other in Staten Island. Angela and John have 4 children and their ages all coincide with the ages of my brother, sister and I. So we are all very close. My parents are very good friends with Angela and John and Marie their youngest is my best friend. I can't begin to tell you about the memories that she and I have. We grew up together and have been through it all. I think I may have mentioned that growing up I was a very picky eater. Poor Angela. All the weekends (and weeks in the summer) that I spent at her house, being a picky brat. If only I knew all the things I was missing by being afraid to try things! Looks like this dish was one of them! Too bad it took me 29 years to figure that out. Better late than never, right?

I am so excited that I tried this dish and loved it. It gave me so many ideas for future recipes. Normally when I make soup I start with chicken stock and add some tomato product (sauce, paste, fresh chopped tomatoes, etc.) to give it a little pink color and some rich tomato flavor. Angela does it a little different. She starts with a marinara sauce and then adds pasta water until it's the consistency she likes. I've used pasta water before to make sauces or as a thickner but never like this. I thought that it would taste great with an addition of canellini beans, using any green you have on hand, as the base of a minestrone, etc. Thanks Angela for teaching me something new and opening me up to endless possibilities. Isn't it great that I'm no longer a picky eater?

Next time I will use two bunches of kale because I loved the flavor, I think that's what you should do too. Angela uses broken spaghetti in this dish which is great. I love making lentils like that too. Most Italian stores now carry bags of broken spaghetti so you don't have to do it yourself. If you'd like you can use any soup pasta such and tubettini, ditalini, small shells, etc.

To remove kale from the stem Angela says, "Take kale off the stem by placing your hand at the bottom of stalk,hold firmly, and with the other hand cupped around the bottom push to the top of the stem. The kale comes off easily." She's right, it was very easy!


Angela's Pasta with Kale

Ingredients:

2 bunches kale, washed and leaves removed from the stems
1 pound broken spaghetti
Marinara Sauce, see below

Directions:

1. Prepare Marinara sauce in a large pot. Later on you're going to add the kale and pasta to this pot so make sure it's big enough.

2. In another large pot boil kale for about 15 minutes in boiling salted water. Kale is ready when you can easily pierce it with a fork. Remove kale with a slotted spoon and put on a baking sheet to cool. Once it's cool, chop cooked kale into bite sized pieces and add it to the sauce. Stir to combine.

3. In the same pot that you cooked the kale, cook broken spaghetti until al dente. Ladle pasta plus some water into the sauce until it becomes a thick soup like consistency. Once you have all the pasta water you want to use already in the pot you can drain the rest of the pasta and add it to your sauce and kalem stir to combine. (Another way you can do this is drain the pasta and reserve some of the water and add it to the sauce - but I suggest the other way until you are familiar with how much water you want. You don't want to run into not having enough starchy pasta water)

4. Sprinkle in a couple of tablespoons of your favorite cheese (I love Romano) and mix it in. Dish into bowls and pass around more cheese if you like. (I like lots of cheese in my soup)


Marinara Sauce

Ingredients:

1 28oz can crushed tomatoes
4 cloves minced garlic
1 medium onion, diced
3 tsp chopped basil
1-2 tsp dried Italian seasoning
crushed red pepper flakes, to taste
salt and pepper to taste
1 tsp sugar
extra virgin olive oil

Feel free to use fresh frozen or dried herbs. Sometimes I use the Italian Seasoning but this time I didn't because I didn't want it to overpower the flavor of the kale. It's a preference, it will be good either way.

Directions:


Sweat onions in extra virgin olive oil and then add garlic in oil. Let it cook for a minute or to and then add crushed red pepper and frozen or dried herbs. Add tomatoes, salt, pepper and sugar. If using fresh herbs add now. Let it come to a boil and then lower heat. Cook on medium for 30-40 minutes. Taste it and adjust seasoning as needed.


Daring Bakers: Vol-Au-Vents


The September 2009 Daring Bakers' challenge was hosted by Steph of A Whisk and a Spoon. She chose the French treat, Vol-au-Vents based on the Puff Pastry recipe by Michel Richard from the cookbook Baking with Julia by Dorie Greenspan.


I can't even begin to tell you how excited I was when I saw this challenge. I've been wanting to make puff pastry and croissants for quite some time now, and here before me was a reason to make at least puff pastry. I knew that if I could pull off making the puff pastry, actually getting it to puff, then making and filling the vol-au-vents was going to be incredibly fun. So fun, in fact, that I decided to turn this challenge into the perfect excuse for a party.


I invited some friends to come over the Wednesday night following my birthday. We were all free that evening and my boyfriend had a softball game, so it was the perfect night to pick for a fun girls'-night-in puff pastry party.


The weekend before the party, I prepared the puff pastry. Following the advice of another Daring Baker, I made my vol-au-vents and then prebaked them for about 15 minutes. Once they were cool, I put them in freezer bags and stashed them in the freezer until the night of the party.


It was so nice having them all done and being able to just concentrate on making the fillings and spending time with my friends. We made a batch of savory vols-au-vent and then a batch of sweet ones.

The filling options for the savory puffs included caramelized onions; roasted tomatoes, squash, zucchini, green beans, broccoli, and eggplant; turkey bacon; sundried tomatoes; marinated artichokes; toasted walnuts; dried cherries and dried cranberries; smoked salmon that my mom brought back from Alaska for me; lemony cream cheese; goat cheese, gruyere, feta, and brie; and corn, black beans, avocado, salsa, and Mexican cheese.


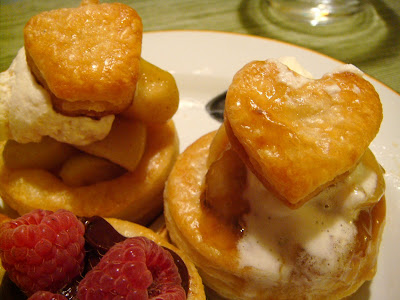
The filling options for the sweet ones included caramelized apples, bananas sauteed in butter and brown sugar, raspberries, strawberries, mangoes, kiwi, homemade whipped cream, homemade caramel whipped cream, chocolate ganache, nutella, toasted walnuts, and basil sugar.


To make the savory ones, we filled our frozen puffs first and then baked them.


To make the sweet ones, we baked the frozen shells and then filled them.


We came up with so many delicious combinations. There's just so much you can do with these, once you get the puff pastry recipe down. Be sure to check out the blogs of other Daring Bakers for even more ideas. And check back for details about making the puff pastry and shaping the vol-au-vents, as well as all of the fillings.