Thursday, August 5, 2010

Olivia's Organics: Dinner Salads And A Giveaway


Olivia's Organics just sent me some free salad coupons, which I was more than happy to start using right away. You see, I buy Olivia's Organics products all the time anyways, so the coupons are just an added bonus.

I really think it was the adorable design and packaging that first drew me to Olivia's Organics. And then once I tried the first package of greens, I wanted to check out another and another. I'm completely hooked now. I've always found the greens to be super fresh, and they're already washed so that makes putting together a salad so much quicker and easier. The greens are all natural and pesticide free, plus Olivia's sends a percentage of its proceeds to the Olivia's Organics Charitable Foundation, so you can really feel good about what you're eating.

My favorites are the Baby Arugula, the Herb Salad, and the Spring Mix. I'm waiting for the Crunch Bunch line to become available in my area!


Right now Olivia's is actually holding a contest where you can submit your best salad recipe for a chance to win a $500 gift card to Williams-Sonoma and have your recipe featured on their site. I'm submitting the salad I'm sharing with you today because it's so full of summer produce and flavors. I hope you're thinking about entering too!

Whenever I make a salad like this, I cut up whole peppers and onions and such and just use as much as I want that night and save the rest for the next night or lunch the next day. The measurements below are not exact. You know how much you like, so top your salad your way! And feel free to sub in other veggies and stuff.

The basil dressing really makes this salad, so give it a try!


Summer Arugula Salad

Ingredients

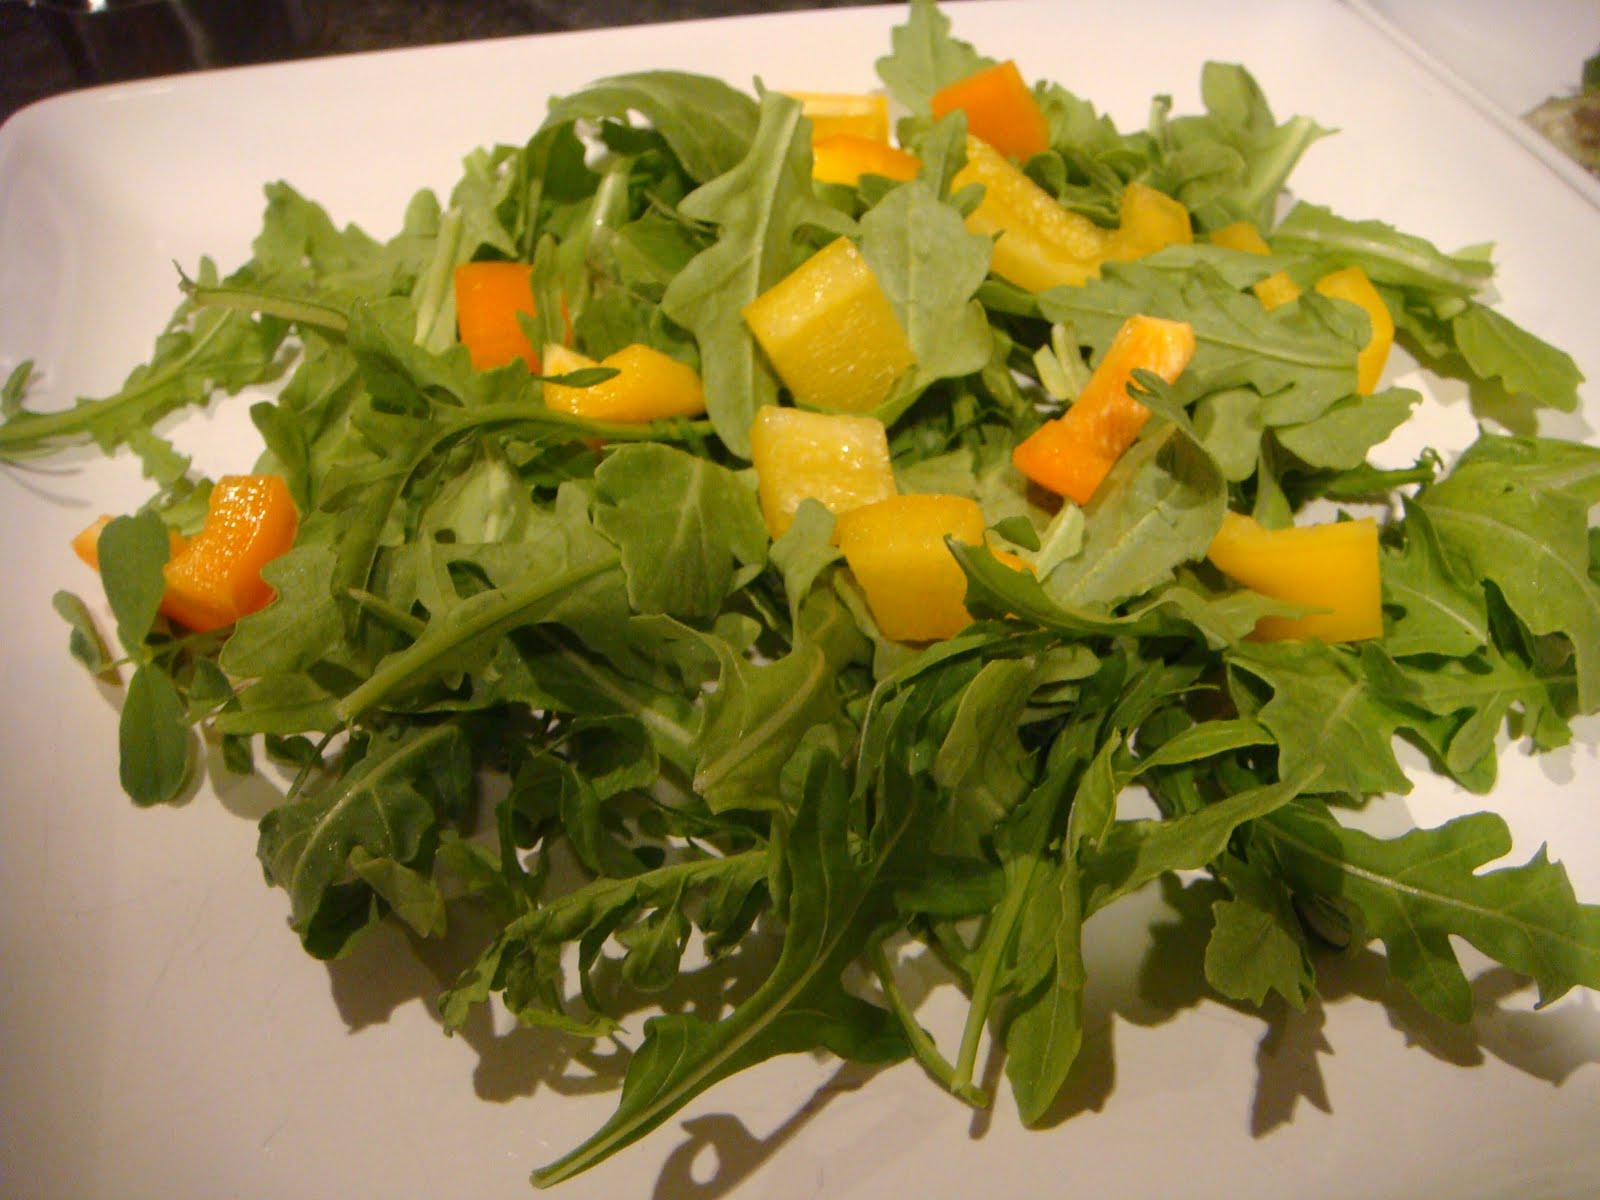
Handful of Olivia's Organics Baby Arugula
1/3 cup diced yellow and orange peppers
2 tablespoons diced red onion
1/3 cup cucumber chunks
Corn kernels, shaved from one ear of corn (I used whiteout corn)
As many heirloom tomato chunks and slices as you dare
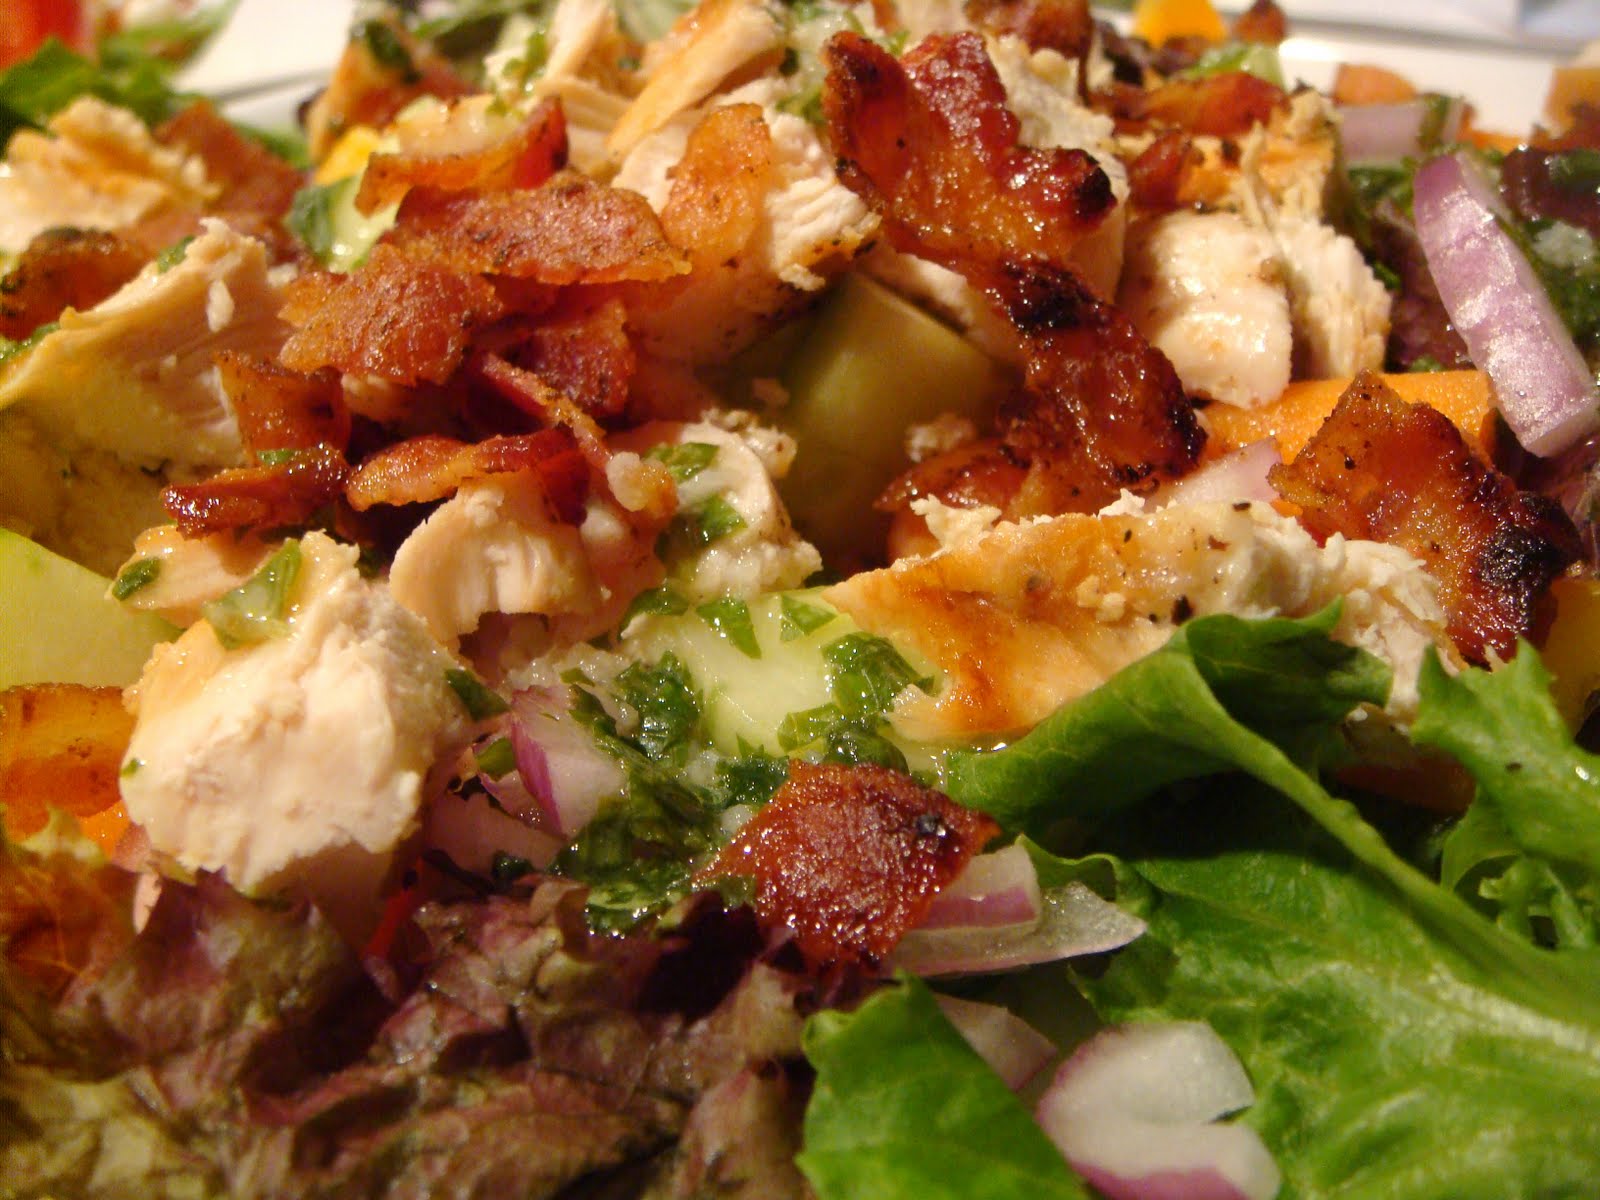
1/2 grilled chicken breast, cubed
3 slices of bacon, cooked and crumbled
Your favorite cheese (I tried ricotta salata and cut it in small, thin squares)
Basil dressing (recipe below)

Preparation

Layer all ingredients except the dressing on a large dinner plate. Drizzle the dressing over everything, toss, and enjoy!

Basil dressing (from Bon Appetit)

Mix 3 tablespoons champagne vinegar with 1 minced garlic clove in a small bowl. Whisk in 1/4 cup extra-virgin olive oil and 1/4 cup finely chopped fresh basil. Season with salt and pepper.

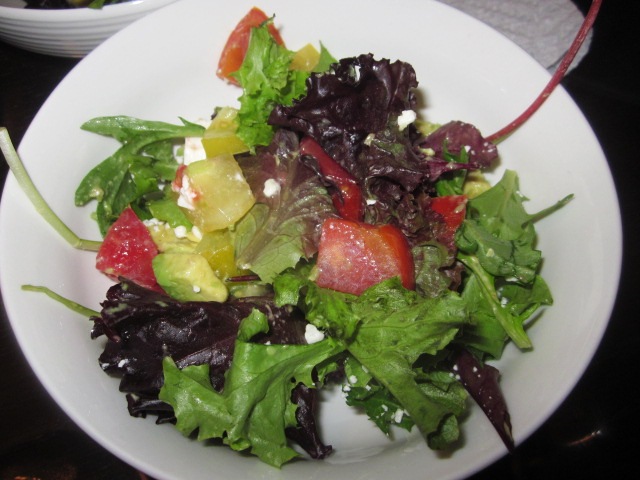
I made this salad for myself and made Jeff a simpler salad with the Spring Mix.


I started our salads the same way -- by grilling three chicken breasts and recrisping some leftover bacon from breakfast.


I figured I would have plenty of veggies in my salad, so I'd only need half a chicken breast, and Jeff would need a whole one. Then we'd have one and a half grilled chicken breasts leftover to make salad preparations go more quickly the next night. It's always nice to get ahead.


With the main protein ready to go, here's how our salads progressed.

His


Hers


Would you like to win some Olivia's Organics salad coupons (totaling about $35 worth of free greens)?

Just leave a comment letting me know which greens you'd want to try and what you'd add to them to make your favorite salad.

Please note: Olivia's is only available on the East Coast. Check this list to see where Olivia's Organics products are available.

You have until Sunday, August 8, at 11:59 p.m. EST to leave your comment.

Make sure you leave an email address where I can reach you if you don't automatically link back to your blog and contact info.

Wednesday, August 4, 2010

Quick Heirloom Tomato Snacks


I'm the type of person who usually needs an after-work snack -- maybe it was all the years of being granted an after-school snack when I was younger. Sometimes it won't be the best snack, like some chips or a Lil' Drum, but when I have fresh produce on hand, I'm inspired to make something a little healthier and less likely to fill me up too much before dinner.


A couple of evenings last week when I got in from work, I made myself the tastiest, yet simplest, snack with the heirloom tomatoes I collected at the farmers' market last weekend. All you need to make these are a leftover baguette, heirloom tomatoes, good olive oil, coarse salt, and a fridge full of your favorite cheese.

Slice the baguette and lightly toast the slices. (I found four slices to be plenty for one snack.) Drizzle the slices with olive oil.


Top each slice with a piece of cheese and a slice of tomato. Sprinkle with salt. Here, I used ricotta salata (a firm ricotta cheese) and slices of yellow and red heirloom tomatoes. (Don't worry about cutting into whole tomatoes just to make this snack. Save the leftovers for a salad later on.)


If you have cherry tomatoes, quarter them and pile them on top of the baguette slices with chunks of cheese. Here, I used feta. There's no need to sprinkle these with salt if you have a nice, briny feta or other salty cheese.


You'll love this simple snack that showcases the various textures and flavors of ripe summer heirloom tomatoes!

Do you usually need an after-work snack? What sorts of things do you snack on? 

Do you love summer tomatoes as much as I do? How do you use them?

Remember, if you make something with anything you've grown, gotten through a CSA, or found at a farmers' market, you can email me a link to your post (and a picture if you'd like) by Friday, and I'll include it in my weekly farmers' market roundup. I think it's so beneficial to share recipes and ideas for what to do with abundant summer produce! 

Family Dinner Party

Check out my breakfast. That would be half a cannoli from the pastry shop off the beaten path, guaranteed to have no line when Modern and Mike's are 20 people deep down Hanover Street: Bova's. I've raved about them before and I'll continue to do so further. Last night I hosted a family dinner party. Living in in the heart of Italian greatness, the fact of the matter is, out-of-town guests are always going to want cannolis after dinner. There is absolutley no need to stand in line for an hour on a Tuesday evening with the rest of the out-of-towners to get one. At Bova's I ordered a large cannoli and could only finish half. Since I was going to indulge in the other half for breakfast it seemed only fitting that I splurge on coffee to go with. At 7:30 am, there was no line at Modern Pastry. The counter staff (same woman, as always) was pleasant and prompt. So last night's dinner party I was cooking for six, including Adam and myself, which is no small feat in my tiny kitchen. Same goes for my guests eating crowded around my living room table. Meanwhile, I haven't turned on the oven all summer. Even with the AC blaring, it was a sweatbox. But regardless, my family and I made it work. In attendance was my Mom, my Aunt Joyce - who flew in from The Great Plain State of Iowa earlier that afternoon, my sister Leah, and her boyfriend Tray. After I chatted, entertained, served drinks and appetizers, and opened myself a cold Hoegaarden, it was time for the cooking to begin. Obviously, I am cooking from a recipe, because rarely am I creative enough to concoct something on my own. Enter my Top Chef Cookbook. I decided I wanted to make Harold's Pan-Roasted Chicken with Potato Gnocchi. Since the recipe serves 1, I had to alter it dramatically. In general, it didn't have too many steps or look very difficult to execute. I also substituted a few ingredients.
Daisy's Baked Chicken with Potato Gnocci. Serves: 6.
Ingredients:
-4 tablespoons Olive Oil
-5 boneless skinless chicken breasts. (5 and not 6, because some were monstrous in size.)
-16 ounces fresh potato gnocchi
-1 cup sliced shitake mushrooms
-2 cups sliced crimini mushrooms
-1 large can sweet petite peas
-1 cup chicken stock (In hindsight I might even use a little more.)
-2-3 tablespoons minced fresh thyme
-salt & pepper
Directions:
1) Preheat oven to 425°.
2) Heat 2 tablespoons olive oil - 1 each in dueling medium oven-safe pans over medium-high heat. Add the chicken, and brown for about 6 minutes. Season with salt & pepper. Flip chicken, and transfer pan to oven. If you don't have an oven safe pan (like me) transfer chicken using tongs into baking dishes. The reason I call for dueling pans is it keeps everything even. I can cook all 5 chicken breasts at once, rather than 2 at a time if I was only using one pan.
3) While chicken is roasting (about 25 minutes), add the remaining 2 tablespoon olive oil - 1 in each pan over medium-high heat. (I am using the same pans I used in step one here. One pan really isn't enough for all that gnocchi.)
4) Add the gnocchi and mushrooms, and cook, stirring frequently, until mushrooms are softened and gnocchi is browning, about 7 minutes. 5) Add the peas, then chicken stock and thyme. Cook until the mixture is thickened, and season with salt and pepper.
To serve: Place the chicken on the plate and surround with mushroom, pea and gnocchi mixture. Pour the juices over the chicken and vegetables. Harold's plate: (source)
Daisy's plate:
The bone and skin on Harold's chicken, as well those unobtainable hen of the woods mushrooms, add an element of presentation, and I am sure taste, that mine is lacking. Not to say it made a huge difference, because while the looks of my chicken was rather plain, and haphazardly plated (gimme a break, I had six, he only had one!) my dish as a whole was bursting with flavor. The thyme (fresh from Mom's garden) and the stock enhanced the juicy chicken and the other texturally diverse ingredients. Thick chewy potato gnocchi, tiny bursts of sweet peas and soft savory mushrooms combined for a memorable dish which I would definitely recommend for your next dinner party, or a dinner for one. I served the meal with a simple side salad that consisted of Olivia's Organics Spring Mix, avocado, yellow tomato (Mom's garden), Red tomato (Leah's garden) and Athenos feta cheese. It goes without saying, no family gathering is complete without photo shoots. One session before dinner when it was still light out, and one after dinner when it was dark, before we made our way out for cannolis. The below shot shows the full effect of the auto timer set up - we had to get everyone in one pic!
Fast forward to after dinner.
Sisters times two!
And of course, the Bova's trip.

Myers + Chang's Green Papaya Slaw

This past spring, Bret and I took a really fun cooking class at Myers + Chang.  In fact, we had such a great time at our cooking class that we're signed up to take another one this weekend!  One of the dishes that we learned to make at our first class was a really delicious green papaya slaw that we hadn't had the chance to make on our own yet.  When we decided to make Momofuku's pork belly buns on Saturday, I knew that this was the perfect side dish for it.

On Saturday morning, while our pork belly was brining, we headed off to Ming's Supermarket to get our green papaya and Thai bird chili peppers.  It actually took us quite some time to find our green papaya since everything was written in Chinese at the market!  But eventually, with some help, we found what we were looking for.


While our pork belly was roasting for two hours, Bret and I had plenty of time to work on our green papaya slaw.  First, I peeled the green papaya.  When I was done peeling it, Bret sliced it in half lengthwise and removed the seeds.


After the seed were removed, Bret julienned the papaya.  At first we were worried that there wouldn't be enough green papaya but you have no idea how much flesh there is to this unripened fruit!  While Bret was busy julienning the papaya, I got to work on chopping up three-quarters cup of roasted peanuts.


I also sliced up six Thai bird chilies.  The recipe only called for four but we like to add a little more spice to every dish.


I added the chilies to my Nuoc Cham sauce, which also had the juice of two medium limes, two tablespoons of sugar, two minced cloves of garlic and two tablespoons of fish sauce.  I added the Nuoc Cham to the bowl with the green papaya and the chopped peanuts.


And then came the fun part - pounding.  To make sure that all of the flavors really infuse together, you pound the green papaya slaw together.  We used a small Chinese rolling pin and took turns.  To be honest, I thought it was really therapeutic!  Since we still had to wait for the pork belly to roast, we put the slaw in the fridge, which only helped to infuse the flavors even more.


The green papaya is pretty flavorless on its own but it had a nice spicy and sweet flavor with the Nuoc Cham sauce.  Plus, the green papaya and the chopped peanuts had a nice crunch.  We topped the slaw with more fresh chopped peanuts and cilantro and served it with our pork belly buns.  The crunchy green papaya slaw added a nice crunch to our luscious pork belly buns, and I was thrilled to finally get the opportunity to make this dish! 


Have you taken any interesting cooking classes lately? Where did you go and what did you learn to make?

Tuesday, August 3, 2010

Raspberry-Fig Goat Cheesecake Bars

Before I get to the cheesecake, I just wanted to say thanks for all your comments on my tri posts!   My xray revealed no stress fracture or bone spur, so that is good news.  I got the go ahead to try a little bit of running again to see how things feel, so *fingers crossed* things will go alright!


Inspired by a frozen yogurt recipe, I had been waiting for the day that I would find both fresh figs and raspberries at the same time.  I liked the idea of this combination and knew it would be perfect on top of cheesecake!   I thought they turned out really well and hopefully we'll get some testers to speak up in the comments ;)


Raspberry-Fig Goat Cheesecake Bars
Recipe by Shannon
Yield:  9x13 pan, # will depend on how big you cut them!

There are a few steps to making this cheesecake, but the puree and crust can be made ahead!

For the Puree:
3.5oz fresh figs, halved (~1/2c)
4.5oz raspberries (~1c)
~2T evaporated cane juice (or granulated sugar)

For the crust:
1 sleeve low-fat graham crackers (or 4.5oz of your favorite variety)
1/2c rolled oats
2T evaporated cane juice (or granulated sugar)
1/4c white whole wheat flour
3T butter, melted
4T almond milk (more if needed)

For the Cheesecake:
12oz goat cheese  (or 11oz, if that's the size of your package)
2-8oz pkg Nufatchel (1/3 less fat cream cheese)
1 lemon, zest and juice
1 1/2t vanilla
1 1/4c evaporated cane juice (or granulated sugar)
4 eggs  (next time I might try 2 eggs and 1/2c egg whites)

For the fig puree, combine figs and raspberries in the bowl of a food processor (or blender).  Puree, taste, and add sugar 1T at a time.  Depending on how ripe the fruit is, the amount you add will vary.  Set aside.  (This makes ~3/4c)

For the crust, preheat oven to 350.   Combine graham crackers, oats, sugar, flour and butter in the bowl of a food processor (or blender).  Blend until finely ground.  Add milk and pulse until completely moistened, you may need more milk.

Pour the graham cracker mixture into a 9x13 pan sprayed with nonstick spray and press evenly into the bottom.   Bake for 10min, then cool on a rack for at least 20min.

For the cheesecake, reduce oven temp to 325.  Cream together goat cheese, cream cheese, lemon zest and juice and vanilla. Add in sugar in two additions, beating until mixture is creamy.  Add eggs, one at a time, scraping down the sides of the bowl as necessary.  Continue to mix until very smooth.

Pour cheesecake mix into prepared crust and spread evenly.  Add the raspberry-fig puree on top of the cheesecake and swirl around using a knife.  There's no rhyme or reason, just get creative!  Bake 50-60min, until the edges look set and the center is a bit jiggly.  Cool completely in the pan.  Then cut into whatever sizes you prefer (I went with ~1" squares).

The original instructions said to refrigerate it for at least 6 hours before serving, but we enjoyed them pretty much right after baking...  I think everyone liked them anyways :)  They also hold up well in the freezer, and are tasty frozen, too!

Homemade Lemonade Beats The Heat


It's the middle of summer and it's hot, but luckily there's something to refresh you and quench your thirst: lemonade. And what's better than just lemonade? Homemade lemonade! Above 90 and humid (our predicted weather for the next two days) is no match for this summer staple.


To start, you'll need a whole lot of lemons. The first time I made this, I think I only had 10 or 12 small lemons, and that was not nearly enough to do the job. This time I bought 7 large lemons and a bag of small lemons. The large lemons are more expensive, but they provide more juice so it's a tossup over which is better to get. I recommend some large and some small for cost and time efficiency. (And don't worry about buying too many lemons because I'll be posting some more recipes soon that use lemons!)


Speaking of time efficiency, some tools were created to make our lives easier. After my first time making lemonade a few weeks ago, I refused to make it again until I had a tool to help me squeeze the lemons. Just thinking about squeezing lemons by hand makes my hands ache.

As is typical for me, I already knew exactly what tool I wanted: this Chef'n Citrus Juicer. OXO had a decent one too, but the bright yellow of the Chef'n one is what drew me to it in the first place and won me over in the end.


If you're making lemonade or some other beverage or treat that requires squeezing a lot of lemons or limes and you don't want to shell out the big bucks for a fancy-schmancy electric juicer, this little tool works just fine. I found it at Williams-Sonoma (any excuse to go in there, right?) for just $19.95, and that's totally worth it for all the soreness and stinging it saved my hands from. (Does Williams-Sonoma have an affiliates program? I could recommend a million products there!)

To use the juicer, simply slice all of your lemons in half.


Place a lemon half in the juicer, cut side down. This will seem counterintuitive based on the shape of the juicer, but that's the way to do it.


And just squeeze the handles together over a large measuring cup. You don't even have to squeeze very hard because the tool is designed to help you get the maximum amount of juice without overly exerting yourself. Repeat until you've juiced all of your lemons. I set a strainer inside the measuring cup just to catch any small seeds or pulp clumps that sneaked through the juicer.

Don't the juiced lemon remains look so funny?
You'll want to end up with 2 cups of lemon juice for this recipe. Set that aside and then in another microwave-safe measuring cup or small bowl, microwave 1 cup of water until boiling (2 to 3 minutes depending on your microwave). Dissolve 2 cups of sugar in the water.

In a gallon (or 16-cup) pitcher, combine the lemon juice and sugar/water mixture. None of my pitchers are quite big enough to hold a gallon, so I used the largest Pampered Chef bowl I have that has measurement guides on the inside. You basically need anything that holds 16 cups of liquid. Add cold water to the liquids in your pitcher, bowl, or other container until you have 16 cups of liquid.


Fill your favorite lemonade glasses with ice, and pour in some of your fresh, homemade lemonade. Top with lemon slices, sip, and feel instantly refreshed!

(I got these summery glasses at Crate & Barrel -- another of my favorite stores with a million products I can recommend!)

Store the remaining lemonade in pitchers in the fridge. Pour over ice, sip, and chill out any time the hot, humid weather starts to bring you down.

This lemonade recipe is adapted from The Food Network.

Have you made homemade lemonade? Have you tried different flavors? I'm thinking about doing a blackberry or raspberry lemonade soon!