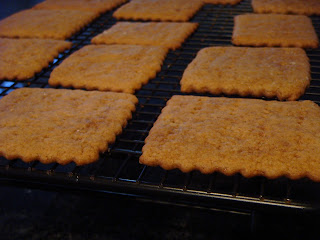
The January 2010 Daring Bakers’ challenge was hosted by Lauren of Celiac Teen. Lauren chose Gluten-Free Graham Wafers and Nanaimo Bars as the challenge for the month. The sources she based her recipe on are 101 Cookbooks and http://www.nanaimo.ca/.
Lauren wanted us to make Nanaimo bars because they are actually from a city in Canada (called Nanaimo), and this is the perfect time to feature a Canadian dessert since the 2010 Winter Olympics are starting in Vancouver very soon!
What can I say? This was another great Daring Bakers' challenge. Lauren gave us the option of making the graham wafers (or graham crackers) gluten free or with flour. I originally planned to make them gluten free, but ultimately I used flour just to save myself a trip to the grocery store. Yes, I know. It was slightly lazy of me. But can you really call someone who spends the time to make graham crackers from scratch lazy?
Homemade Graham Crackers (adapted from 101 Cookbooks)
Ingredients
2 cups plus 2 tablespoons all-purpose flour
1/2 cup whole wheat flour
1 cup dark brown sugar, lightly packed
1 teaspoon baking soda
3/4 teaspoon kosher salt
7 tablespoons unsalted butter, cut into 1-inch cubes and frozen
1/3 cup mild-flavored honey, such as clover
5 tablespoons whole milk
2 tablespoons pure vanilla extract (I would cut this way back if I made these again. Just a teaspoon would be plenty.)
Preparation
Combine flour, brown sugar, baking soda, and salt in food processor fitted with the steel blade. Pulse to incorporate. Add the butter, and pulse until the mixture is the consistency of coarse meal.
In a small bowl, whisk together the honey, milk, and vanilla extract. Add to the flour mixture, and pulse a few times until the dough barely comes together. It will be very soft and sticky.
Turn the dough out onto a lightly floured work surface, and pat the dough into a rectangle about 1 inch thick.
Divide the rectangle in half using a bench scraper or knife, and wrap each half in plastic and chill until firm, about 2 hours or overnight.
Take out one package of dough and roll the dough into a long rectangle about 1/8 inch thick on a lightly floured countertop. The dough will be sticky, so flour as necessary. Cut dough into whatever size crackers you'd like. Gather any scraps together, and set aside.
Preheat oven to 350 degrees.
Gather the scraps together into a ball, chill until firm, and reroll. Dust the surface with more flour, and roll out the dough to get about two or three more crackers. (You can also freeze the leftover dough if you're all crackered out by this point.)
If desired, mark a vertical line down the middle of each cracker, being careful not to cut through the dough. Using a toothpick or skewer, prick the dough to form two dotted rows about 1/2 inch for each side of the dividing line.
Bake each sheet of crackers in preheated oven for 10 to 12 minutes, or until browned and slightly firm to the touch, rotating the sheets halfway through to ensure even baking.
I thought these had a much better texture than store-bought graham crackers. They were crunchy but also slightly chewy. I also think they look much more appetizing. What do you think?
It made me a little sad to know I had to crush up my newly made graham crackers, but the Nanaimo bars came out so good that I didn't miss the grahams all that much in the end!
Below is the recipe Lauren provided with a few modifications I made to simplify the process (such as skipping the double boiler). I also opted to toast the almonds and coconut, which you don't have to do, but I prefer the stronger, nuttier flavor that comes with the toasting, not to mention the added crunch.
Nanaimo Bars
Ingredients
Bottom Layer
1/2 cup unsalted butter
1/4 cup granulated sugar
5 tablespoons unsweetened cocoa
1 large egg, beaten
1 1/4 cups graham cracker crumbs (from homemade graham crackers)
1/2 cup almonds (toasted and finely chopped)
1 cup shredded coconut (toasted)
Middle Layer
1/2 cup unsalted butter
2 tablespoons and 2 teaspoons heavy cream
2 tablespoons vanilla pudding mix (or vanilla custard powder, if you can find it)
2 cups confectioners' sugar
Top Layer
4 ounces semisweet chocolate
2 tablespoons unsalted butter
Directions
Bottom Layer: Melt unsalted butter, sugar, and cocoa in a small pot over low heat. Add egg, and stir to cook and thicken. Remove from heat. Stir in crumbs, nuts, and coconut. Press firmly into an ungreased 8- by 8-inch pan.
Middle Layer: In bowl of electric stand mixer, cream butter, heavy cream, pudding mix, and confectioners' sugar together. Continue beating until light in color. Spread over bottom layer.
Top Layer: Melt chocolate and unsalted butter in microwave. Cool, pour over middle layer, and chill.
It's best to take the bars out of the fridge about 15 minutes before you plan to cut them, otherwise they will be too hard to cut and the top chocolate layer will shatter.
Note: You can freeze the bars... and you may want to so you don't eat them all in one sitting. Another option is to bring them to the office and share them with coworkers.
I loved these! The bottom layer is rich and crunchy. The middle is supposed to be a custard, but mine came out more like frosting -- no complaints there. And who doesn't love a nice layer of chocolate to top the whole thing off? If you're planning to watch the 2010 Olympics, you might want to make these to snack on during the Opening Ceremonies!
Thank you, Lauren!


No comments:
Post a Comment